MySound Wireless TV Headset Setup Guide (Elite Plus)
English instructions: setup, pairing, clock radio, and troubleshooting
This guide shows you how to set up your MySound Wireless TV Headset system—charge the headsets, connect the transmitter to your TV, pair everything, and use the clock radio features.
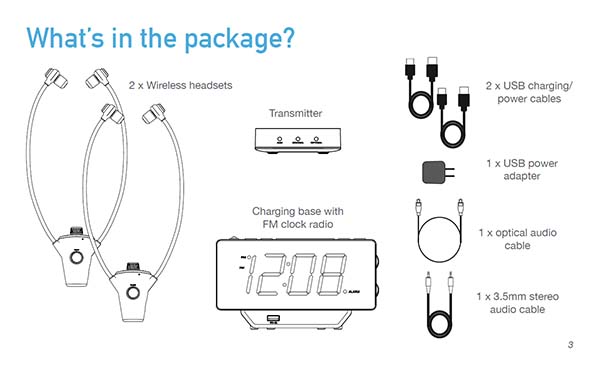
What’s in the package
- 2 × Wireless headsets
- Charging base with FM clock radio
- Transmitter
- 2 × USB charging/power cables
- 1 × USB power adapter
- 1 × Optical audio cable
- 1 × 3.5mm stereo audio cable
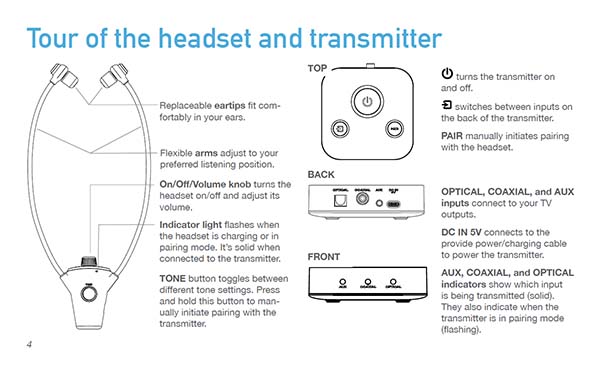
Tour of the headset and transmitter
Headset
- Replaceable eartips fit comfortably in your ears.
- Flexible arms adjust to your preferred listening position.
- On/Off/Volume knob turns the headset on/off and adjusts volume.
- Indicator light flashes when charging or pairing; stays solid when connected.
- TONE button toggles tone settings; press and hold to manually initiate pairing.
Transmitter
- Power turns the transmitter on/off.
- Input switches between OPTICAL, COAXIAL, and AUX.
- PAIR manually initiates pairing with the headset.
- Rear inputs: OPTICAL, COAXIAL, AUX
- Power input: DC IN 5V
- Front indicators show the active input (solid) and pairing mode (flashing).
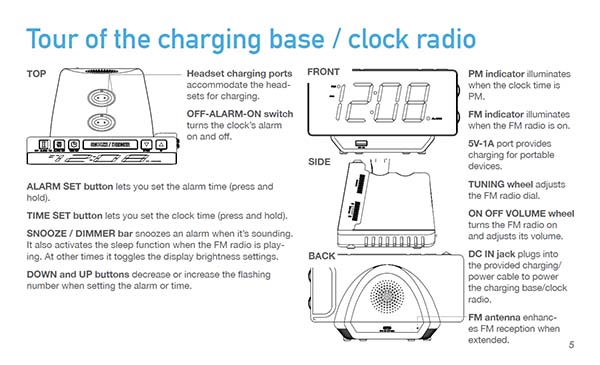
Tour of the charging base / clock radio
- Headset charging ports hold the headsets for charging.
- OFF-ALARM-ON switch turns the alarm on/off.
- ALARM SET sets the alarm time (press and hold).
- TIME SET sets the clock time (press and hold).
- SNOOZE / DIMMER bar snoozes alarm; activates radio sleep while FM is playing; otherwise toggles brightness.
- UP / DOWN adjust the flashing number when setting alarm or time.
- PM indicator lights when the time is PM.
- FM indicator lights when the FM radio is on.
- 5V-1A port charges portable devices.
- TUNING wheel tunes the FM radio.
- ON OFF VOLUME wheel turns FM on and adjusts its volume.
- DC IN jack powers the charging base/clock radio.
- FM antenna improves reception when extended.
Getting started
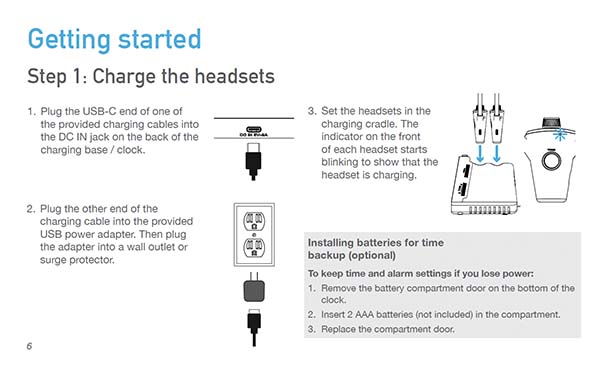
- Plug the USB-C end of one provided charging cable into the DC IN jack on the back of the charging base / clock.
- Plug the other end of the charging cable into the provided USB power adapter, then plug the adapter into a wall outlet or surge protector.
- Set the headsets in the charging cradle. The indicator on the front of each headset starts blinking to show it is charging.
To keep time and alarm settings if you lose power:
- Remove the battery compartment door on the bottom of the clock.
- Insert 2 × AAA batteries (not included).
- Replace the compartment door.
Step 1: Charge the headsets
- Confirm the charging base/clock is plugged in and powered.
- Place both headsets into the charging cradle.
- Verify each headset indicator is blinking to show charging.
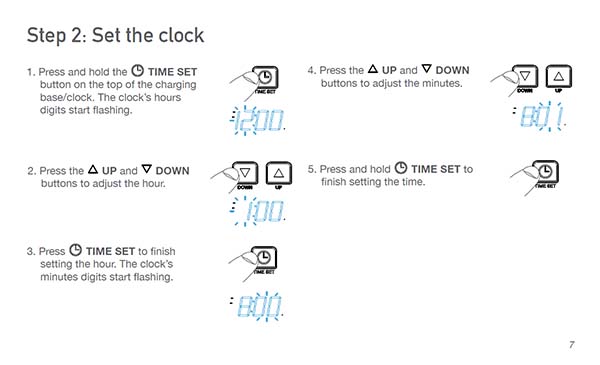
Step 2: Set the clock
- Press and hold TIME SET on the top of the charging base/clock. The hours digits start flashing.
- Press UP / DOWN to adjust the hour.
- Press TIME SET to finish setting the hour. The minutes digits start flashing.
- Press UP / DOWN to adjust the minutes.
- Press and hold TIME SET to finish setting the time.
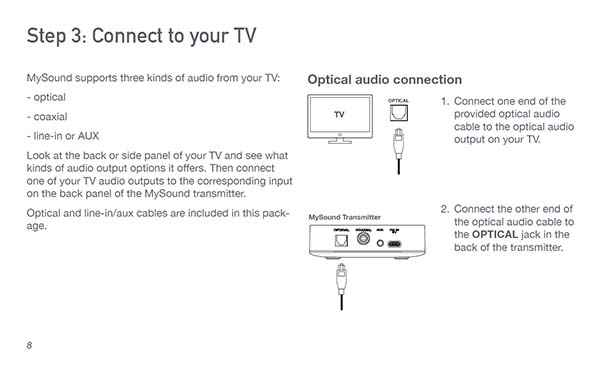
Step 3: Connect to your TV
MySound supports three kinds of audio from your TV: OPTICAL, COAXIAL, and LINE-IN / AUX. Look at the back or side panel of your TV to see what audio output options it offers. Then connect one of your TV audio outputs to the corresponding input on the back panel of the MySound transmitter.
OPTICAL (Optical audio connection)
- Connect one end of the provided optical audio cable to the optical audio output on your TV.
- Connect the other end to the transmitter’s OPTICAL jack.
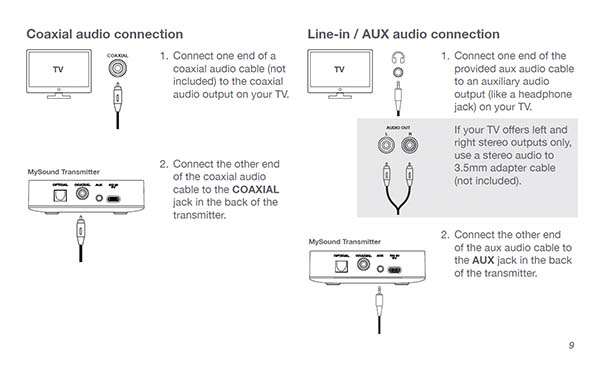
COAXIAL (Coaxial audio connection)
- Connect one end of a coaxial audio cable (not included) to the coaxial audio output on your TV.
- Connect the other end to the transmitter’s COAXIAL jack.
LINE-IN / AUX (AUX audio connection)
- Connect one end of the provided AUX audio cable to an auxiliary audio output (like a headphone jack) on your TV.
- If your TV offers left and right stereo outputs only, use a stereo-audio-to-3.5mm adapter cable (not included).
- Connect the other end of the AUX audio cable to the transmitter’s AUX jack.
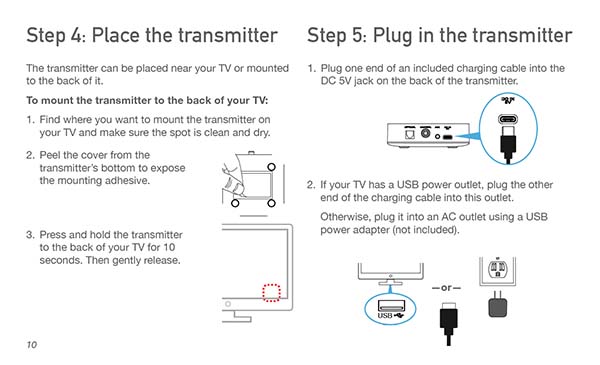
Step 4: Place the transmitter
The transmitter can be placed near your TV or mounted to the back of it.
- Find where you want to mount the transmitter on your TV and make sure the spot is clean and dry.
- Peel the cover from the transmitter’s bottom to expose the mounting adhesive.
- Press and hold the transmitter to the back of your TV for 10 seconds. Then gently release.
Step 5: Plug in the transmitter
- Plug one end of an included charging cable into the DC 5V jack on the back of the transmitter.
- If your TV has a USB power outlet, plug the other end of the charging cable into this outlet.
- Otherwise, plug it into an AC outlet using a USB power adapter (not included).
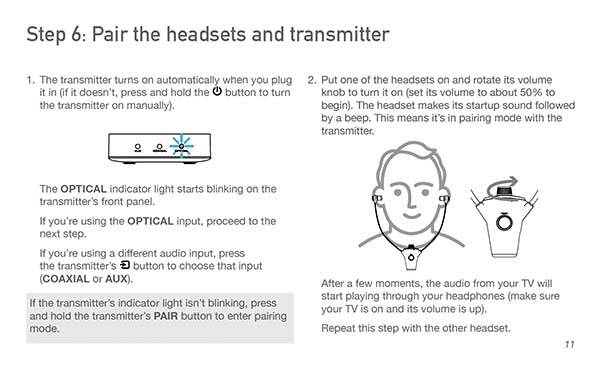
Step 6: Pair the headsets and transmitter
-
The transmitter turns on automatically when you plug it in. (If it doesn’t, press and hold the transmitter’s
Power button to turn it on manually.)
The OPTICAL indicator light starts blinking on the transmitter’s front panel.
If you’re using the OPTICAL input, proceed to the next step.
If you’re using a different audio input, press the transmitter’s Input button to choose that input (COAXIAL or AUX).
If the transmitter’s indicator light isn’t blinking, press and hold the transmitter’s PAIR button to enter pairing mode. - Put one of the headsets on and rotate its volume knob to turn it on (set its volume to about 50% to begin). The headset makes its startup sound followed by a beep—this means it is in pairing mode with the transmitter.
- After a few moments, the audio from your TV will start playing through your headset (make sure your TV is on and its volume is up).
- Repeat the previous step with the other headset.
Using MySound
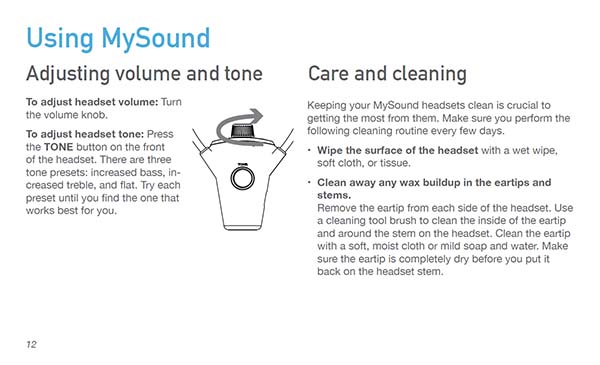
Adjusting volume and tone
- To adjust headset volume: Turn the volume knob.
- To adjust headset tone: Press the TONE button on the front of the headset. There are three tone presets: increased bass, increased treble, and flat. Try each preset until you find what works best for you.
Care and cleaning
Keeping your MySound headsets clean is crucial to getting the most from them. Perform this routine every few days:
- Wipe the surface of the headset with a wet wipe, soft cloth, or tissue.
- Clean away any wax buildup in the eartips and stems.
- Remove the eartip from each side of the headset.
- Use a cleaning tool brush to clean the inside of the eartip and around the stem on the headset.
- Clean the eartip with a soft, moist cloth or mild soap and water.
- Make sure the eartip is completely dry before putting it back on the headset stem.
Using the clock radio
Using the alarm
To set an alarm:
- Press and hold ALARM SET on top of the clock radio. The alarm hours flash.
- Use UP / DOWN to adjust the alarm hour. Press ALARM SET to set it. The alarm minutes flash.
- Use UP / DOWN to adjust the alarm minutes. Press and hold ALARM SET to set the alarm time and exit alarm setting mode.
To turn the alarm on/off: Move the OFF ALARM ON switch to OFF or ON.
To snooze the alarm: Press the SNOOZE / DIMMER bar while the alarm is sounding. The alarm snoozes for 9 minutes.
Using the FM radio
- Turn FM on: Rotate the ON OFF VOLUME wheel to the on position.
- Tune: Rotate the TUNING wheel. The display shows the current FM frequency/station.
- Adjust volume: Rotate the ON OFF VOLUME wheel. The display shows the current volume level.
- Turn FM off: Rotate the ON OFF VOLUME wheel past minimum volume to switch it off.
- Sleep feature: While listening to the radio, press the SNOOZE / DIMMER bar to cycle sleep settings: 90, 45, 30, 15 minutes, and OFF (display shows the current setting).
Troubleshooting
If you don’t hear audio from your headset
- Confirm whether you are connected to Optical, Coaxial, or AUX. (See Step 3)
- Make sure the headset is turned on (blue indicator light illuminated). Then turn volume up using the volume knob.
- If the headset won’t turn on, it may need recharging. Place it in one of the cradles on the charging base.
- Make sure the TV isn’t muted and that it is still connected to the transmitter.
- If the headset’s indicator light is blinking, the transmitter may not be powered on. Confirm an indicator light on the transmitter is lit. If not, press the transmitter’s button to turn it on.
- If the transmitter’s indicator light is blinking, it needs to be paired again with the headset. Press and hold the headset TONE button to initiate pairing.
If TV audio is distorted or has static
- You may need to adjust your TV settings for the type of audio connection you are using.
- If you’re using an optical audio connection, you may need to change your TV’s audio out setting to DTS or PCM. See your TV’s user manual for details.